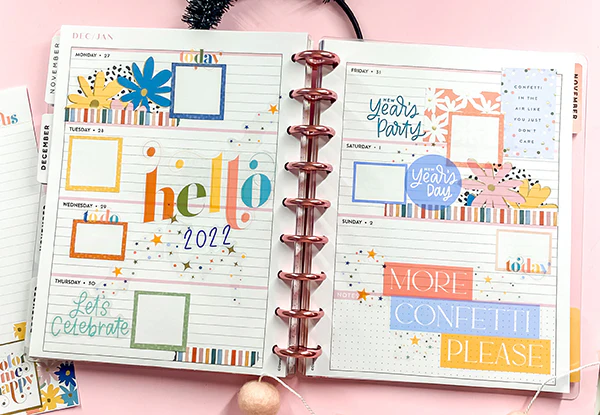
The Happy calendar is more than just a simple calendar; it’s a creative tool for organizing your life in a fun and personalized manner. The Happy Planner can help you keep track of appointments, manage your duties, or simply provide a creative outlet. If you’re new to this versatile planning system, this article will lead you through the basics so you can get started and master your Happy Planner.
What is the Happy Planner?
The Happy Planner, designed by Me & My Big Ideas, is a customisable planner system that blends traditional planning with creativity. It has a unique disc-binding technology that enables users to effortlessly add, remove, and rearrange pages. The Happy Planner comes in a variety of sizes, patterns, and layouts, making it ideal for everyone from students to busy professionals.
Why Choose the Happy Planner?
- Customization: The Happy Planner can be personalized to fit your unique needs. With a variety of planner layouts, accessories, and stickers, you can create a planner that is truly your own.
- Creative Outlet: The Happy Planner encourages creativity. You can use colors, stickers, and doodles to make planning enjoyable.
- Community: The Happy Planner has a thriving community. You can find inspiration, tips, and support from other Happy Planner users through social media, blogs, and forums.
Getting Started with Your Happy Planner
Choosing the Right Size
Happy Planners available in three sizes: classic, mini, and large. Choosing the appropriate size is determined on your lifestyle and interests.
- Classic Size: Ideal for everyday use and fits well in most bags. It’s perfect for those who want a balance between portability and space.
- Mini Size: Great for on-the-go planning. If you prefer a lightweight and compact option, this size is perfect.
- Big Size: Offers more writing space, making it suitable for extensive planning and journaling. Ideal for those who like to have more room for creativity.
Selecting Your Layout
The Happy Planner has a variety of layouts, including vertical, horizontal, and dashboard views. Every layout has its own advantages:
- Vertical Layout: Best for those who prefer a time-blocking approach or have numerous tasks for each day.
- Horizontal Layout: Ideal for a more traditional planning style, where you can write tasks in rows.
- Dashboard Layout: Perfect for visual planners, this layout provides sections for tasks, appointments, and notes.
Experiment with different layouts to find what works best for you.
Customize Your Planner
Customization possibilities are one of the Happy Planner’s main features. Here are some ways you can personalize your planner.
- Covers: Choose a cover that reflects your personality. You can even create your own cover using the Happy Planner’s online tools.
- Stickers: Happy Planner offers a wide range of sticker packs, from functional stickers to decorative ones. Use them to highlight important events or to add a pop of color.
- Add-Ons: Consider adding monthly or weekly inserts, note pages, or wellness trackers. The disc system makes it easy to include additional pages.
Organizing Your Planner
A well-organized planner can greatly increase your productivity. Here are some recommendations for organizing your Happy Planner:
- Monthly Overview: Start each month with a monthly overview page. This helps you see upcoming events and appointments at a glance.
- Weekly Spread: Use your weekly spread to break down tasks and appointments. You can allocate specific days for particular tasks to help manage your time effectively.
- Color Coding: Implement a color-coding system to categorize different types of tasks or events (e.g., work, personal, family). This visual cue can help you prioritize your day.
- Use Sections: If you have various areas of focus (e.g., work, fitness, personal), consider using sections in your planner to keep these areas separate.
Setting Goals
Setting goals is a vital component of planning. The Happy Planner encourages users to establish both short-term and long-term goals. Here’s how to do it successfully:
- Monthly Goals: At the beginning of each month, set 2-3 achievable goals. This helps you focus your efforts.
- Weekly Check-ins: Dedicate time each week to review your goals. Assess your progress and adjust your plans as needed.
- Reflect: At the end of each month, reflect on what you accomplished and what you can improve. This practice can help you stay motivated and focused.
Utilizing Accessories
The Happy Planner ecosystem includes various accessories that can enhance your planning experience. Some popular accessories include:
- Punch: A disc punch allows you to create your own custom pages or inserts that fit perfectly in your planner.
- Folders and Pockets: Use folders and pockets to keep loose papers, receipts, or notes organized.
- Sticky Notes: These are great for quick reminders or notes. They can be easily moved around without messing up your planner.
Incorporating Creativity
One of the joys of using a Happy Planner is the ability to incorporate creativity into your planning process. Here are some creative ideas to try:
- Vision Boards: Use a page or section in your planner for vision boards. This can serve as a visual reminder of your goals and dreams.
- Doodles and Drawings: Don’t be afraid to add your own doodles or drawings. This personal touch can make planning more enjoyable.
- Mood Trackers: Consider including a mood tracker in your planner. It can help you reflect on your emotions and promote mental well-being.
- Memory Keeping: Use your planner as a memory keeper. Add photos, ticket stubs, or other memorabilia to document important events.
Staying Motivated
Staying motivated can sometimes be challenging. Here are some tips to keep your planning routine fresh and engaging:
- Join a Community: Engaging with other Happy Planner users can provide inspiration and support. Join Facebook groups, follow planners on Instagram, or participate in local meet-ups.
- Change It Up: Don’t hesitate to change your planner setup or layout if you feel stuck. Experimenting with new designs can reignite your enthusiasm.
- Plan with Friends: Consider planning with friends or family members. Sharing ideas and strategies can be motivating and fun.
Conclusion
Mastering the Happy Planner tool requires effort and experimentation, but the results are worthwhile. You can establish a successful planning system by selecting the appropriate size and style, customizing your planner, setting goals, adding accessories, and applying creativity. Remember that the Happy Planner is more than simply an organizational tool; it is also a canvas for your creativity. Enjoy the planning process and see how it improves your daily life!
With these important suggestions, you’ll be well on your way to mastering your Happy Planner and getting the most out of this unique planning tool. Happy planning!
You May Also Like : Fashion Trends You Can Choose for Your Wedding in Udaipur


