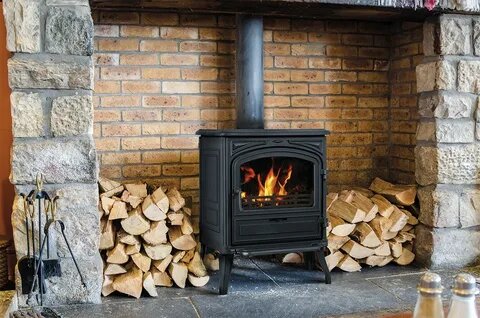
Installing a wood-burning stove vent pipe is a crucial part of setting up your stove for safe and efficient operation. The vent pipe, also known as the flue, allows the smoke, gases, and fumes from your stove to safely exit your home, preventing potential health hazards and ensuring your stove works efficiently. In this guide, we’ll walk you through the process of installing a vent pipe for your wood-burning stove, focusing on safety, efficiency, and budget-friendly tips.
If you’re looking for high-quality wood stoves and venting systems, Caledonian Stoves is an excellent place to start. They offer a wide range of products and expert advice to help you make the right decisions for your installation.
Step 1: Understand the Types of Vent Pipes
Before you begin the Wood burning stove installation, it’s important to understand the different types of vent pipes available for wood-burning stoves. The type of pipe you need depends on your specific stove, home setup, and local building codes.
Common Vent Pipe Types:
- Single-Wall Stove Pipe: This is the most basic and cost-effective option. It is used for short connections between the stove and the chimney. However, because single-wall pipes lose heat quickly, they must be installed with sufficient clearance from walls and ceilings to prevent fire hazards.
- Double-Wall Stove Pipe: Double-wall pipes are insulated, which helps to retain more heat inside the pipe. This reduces the risk of creosote buildup and allows the pipe to be installed closer to walls, making them ideal for tighter spaces.
- Chimney Pipe: For venting through an exterior wall or roof, you’ll need a chimney pipe. These pipes are designed to carry the exhaust outside safely and are usually double- or triple-walled for extra insulation.
Step 2: Plan Your Vent Pipe Route
The path your vent pipe takes from the stove to the outside is an important consideration. The goal is to create the most direct and vertical route possible, as this maximizes the efficiency of the stove and minimizes the risk of blockages and creosote buildup.
Tips for Planning Your Vent Pipe Route:
- Minimize Elbows: Every bend in the pipe can reduce the draft and make the stove less efficient. Try to keep the pipe as straight as possible.
- Vertical Installation: Whenever possible, vent pipes should go straight up through the ceiling or roof, as this helps improve draft and reduces the chances of creosote buildup.
- Clearances: Ensure that the pipe is installed with proper clearance from combustible materials, including walls, ceilings, and furniture. Always follow the manufacturer’s recommendations for minimum clearance distances.
Step 3: Gather Your Tools and Materials
Before you begin the installation, you’ll need to gather the necessary tools and materials. Here’s a list of what you’ll need:
Tools and Materials:
- Vent pipe sections (single- or double-wall depending on your needs)
- Chimney pipe (if venting through the roof or wall)
- Pipe elbows (if needed)
- Pipe collars and brackets for securing the pipe
- Flashing (for sealing the pipe where it exits the roof)
- A roof support kit (if venting through the roof)
- A ceiling support box (for interior venting)
- High-temperature silicone sealant
- A screwdriver or drill
- A reciprocating saw (if cutting through walls or ceilings)
You can find high-quality vent pipes, chimney systems, and other installation accessories at Caledonian Stoves. They offer a wide selection of parts to ensure your installation is done right.
Step 4: Install the First Section of Pipe
Now that you’ve planned your route and gathered your materials, it’s time to start the installation.
Steps for Installing the First Section:
- Attach the First Pipe to the Stove: Start by attaching the first section of the stove pipe to the stove’s flue collar. Make sure it’s securely fastened with screws. If you’re using a single-wall pipe, you may need to use a high-temperature sealant to ensure a proper seal.
- Ensure Proper Clearance: As you attach the pipe to the stove, check the clearance from nearby walls, ceilings, and combustible materials. The clearance will depend on whether you’re using a single-wall or double-wall pipe.
- Install a Heat Shield (if necessary): If you’re using a single-wall pipe and it’s too close to a wall, you may need to install a heat shield to protect the wall from excess heat.
Step 5: Continue Installing the Pipe Upward
Once the first section is attached, continue adding sections of the pipe, working your way upward toward the ceiling or roof.
Additional Tips:
- Use Pipe Collars for Support: As you add sections of the pipe, use pipe collars and brackets to secure the pipe to walls or ceilings. This prevents the pipe from shifting and ensures it stays in place.
- Seal Each Section: If you’re using a single-wall pipe, apply high-temperature silicone sealant at each joint to ensure there are no gaps where smoke or fumes could escape.
Step 6: Venting Through the Ceiling or Wall
The next step is venting the pipe through either the ceiling or an exterior wall. This part of the installation requires extra care to ensure the pipe is safely vented outside without causing any leaks or structural issues.
Ceiling Venting:
- Install a Ceiling Support Box: If you’re venting through the ceiling, install a ceiling support box where the pipe will pass through. This will support the weight of the chimney pipe and provide a safe, sealed passage for the vent.
- Cut a Hole in the Ceiling: Use a reciprocating saw to cut a hole in the ceiling where the pipe will exit. The hole should be large enough to allow the chimney pipe to pass through with the proper clearance.
- Attach the Chimney Pipe: Once the hole is cut, attach the chimney pipe to the top of the stove pipe and feed it through the ceiling support box. Ensure the pipe is properly secured and sealed.
Wall Venting:
- Use a Wall Thimble: If you’re venting through an exterior wall, install a wall thimble where the pipe will pass through. This provides a safe, sealed passage for the pipe.
- Cut a Hole in the Wall: Cut a hole in the wall using a reciprocating saw, making sure it’s large enough to allow the pipe to pass through with the proper clearance.
- Install the Chimney Pipe: Once the hole is cut, attach the chimney pipe to the stove pipe and feed it through the wall thimble.
Step 7: Venting Through the Roof
If your installation requires venting through the roof, follow these steps:
- Install Flashing: Once the chimney pipe reaches the roof, install flashing around the pipe to prevent water from leaking into your home. The flashing should be sealed with high-temperature silicone sealant.
- Install a Chimney Cap: The final step in venting through the roof is installing a chimney cap. The cap prevents debris, animals, and rain from entering the chimney while allowing smoke and gases to escape safely.
Step 8: Test for Leaks and Functionality
Once the installation is complete, it’s time to test your vent pipe system. Light a small fire in the stove and check for any leaks around the pipe joints or where the pipe exits the house. If you notice any leaks, reseal the joints with high-temperature silicone sealant.
Conclusion
Installing a wood-burning stove vent pipe is a crucial step in ensuring your stove operates safely and efficiently. By following these steps, you can install a vent pipe that meets all safety standards while keeping costs under control.
For all your wood-burning stove and venting system needs, Caledonian Stoves offers a wide range of products to suit your budget and ensure a safe installation. Whether you’re a first-time installer or a seasoned DIY enthusiast, their selection and expertise can help you achieve a successful installation.